DIY MIDI controllers: Difference between revisions
mNo edit summary |
|||
| (4 intermediate revisions by the same user not shown) | |||
| Line 20: | Line 20: | ||
Think of a gamepad joystick. | Think of a gamepad joystick. | ||
Now remove the thing that makes it return to center, | Now remove the thing that makes it return to center. | ||
and run a string through that | Also, drill a hole in the middle and run a string through, which will move that joystick. | ||
Also, put that wire on a (spring-returning) spool that ''also'' rotates a [[potentiometer]] to tell you how far out it is. | |||
| Line 28: | Line 29: | ||
This "patented mechanical system for tracking position of physical elements in three-dimensional space in real time"? | This "patented mechanical system for tracking position of physical elements in three-dimensional space in real time"? | ||
Three 5kOhm [[potentiometers]]. | Three 5kOhm [[potentiometers]]. Times two, it has two. | ||
That's ''entirely it'' for measurement. | That's ''entirely it'' for measurement. | ||
| Line 65: | Line 64: | ||
<br style="clear:both" /> | <br style="clear:both" /> | ||
===Interfacing one with software=== | |||
If | |||
* you like joystick input to software, and | |||
* you have a rev2 GameTrak | |||
then you take a few minutes to solder-bridge it for PC, and you're done. | |||
Most music production software allows joystick input some way or other, be it | |||
: any DAWs that has a module that takes joystick-like input, | : any DAWs that has a module that takes joystick-like input, | ||
: or software like [https://chuck.cs.princeton.edu/ ChucK] or [http://www.symbolicsound.com/cgi-bin/bin/view/Products/WebHome Kyma] or [https://cycling74.com/products/max Max]. | : or software like [https://chuck.cs.princeton.edu/ ChucK] or [http://www.symbolicsound.com/cgi-bin/bin/view/Products/WebHome Kyma] or [https://cycling74.com/products/max Max]. | ||
| Line 77: | Line 78: | ||
If you have a rev1 GameTrak, it's just made for PS2s. | |||
It still ''presents'' as a joystick, but it's just odd enough that it won't work. | |||
It's presumably possible to create a PS2-gametrak-specific driver to deal with the different format, but not really a convenient solution in that most platforms do not make custom drivers very easy to use (and it being [[USB HID]] does ''not'' actually make that any easier). | |||
So this became a DIY project instead: | So for me this became a DIY project instead: | ||
===Your own hardware=== | ===Your own hardware=== | ||
The potmeters are all 5kOhm, so putting them across Vcc and Gnd is fine ( | The potmeters are all 5kOhm, so putting them across Vcc and Gnd is fine (dissipates 1mA each at 5V). | ||
Wiring the wiper (middle pin) to an ADC doesn't even really need any extra components. | Wiring the wiper (middle pin) to an ADC doesn't even really need any extra components. | ||
You want some board with an ADC that muxes to at least 6 pins (because six pots) | You want | ||
* some board with an ADC that muxes to at least 6 pins (because six pots) | |||
:: most arduinos, various other microcontrollers (but not RP2040 (RPi Pico)), other | |||
* something that will fit in there | |||
:: e.g. arduino micro and nano, RP2040 (RPi Pico), other | |||
And may prefer: | |||
* preferably something that can speak USB, so you can get it to speak USB-MIDI | |||
:: e.g. arduino leonardo, micro; RP2040 (RPi Pico), other | |||
I only had a nano lying around, so made one with a DIN MIDI output ''instead'' of USB-MIDI. | |||
Which means the electronics work is little more than wires - barely even any resistors or such. | |||
My version is little more than a bunch of cutting, soldering, [[heat-shrink]]ing, and [[hotsnot]]ting down the Arduino. | My version is little more than a bunch of cutting, soldering, [[heat-shrink]]ing, and [[hotsnot]]ting down the Arduino. | ||
| Line 109: | Line 123: | ||
The things you may want to plan up front: | The things you may want to plan up front: | ||
* how and where to fasten the microcontroller (there | * how and where to fasten the microcontroller (there is not a lot of space) | ||
* tension relief on the cable you have/add<!-- | * tension relief on the cable you have/add<!-- | ||
Revision as of 14:52, 29 March 2024
Intro

GameTrak is a motion controller originally designed for Playstation 2 - where it seemed to have gotten support from two games ever -- and later also supported PC and Xbox.
Judging by a youtube search, these days half of its uses seem to be DIYing it for other purposes, primarily music - take a look at videos like
- Game Trak Theory
- Ge Wang: The DIY orchestra of the future
- Line of voice and string -for Game-trak controller, Kyma system.
See also:
"How does it work?"?
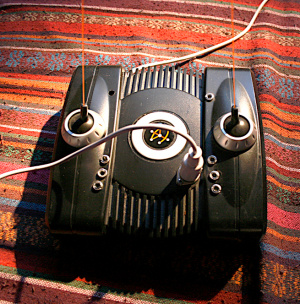
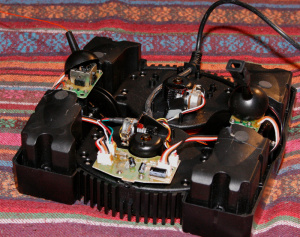
Think of a gamepad joystick. Now remove the thing that makes it return to center. Also, drill a hole in the middle and run a string through, which will move that joystick. Also, put that wire on a (spring-returning) spool that also rotates a potentiometer to tell you how far out it is.

This "patented mechanical system for tracking position of physical elements in three-dimensional space in real time"?
Three 5kOhm potentiometers. Times two, it has two.
That's entirely it for measurement.
All other components are on a board that measures the potentiometers and presents it as a joystick-like interface. There's also an input for a - wait for it - pushbutton.
Oh, and a chunky weight that keeps the thing on the floor.
Board

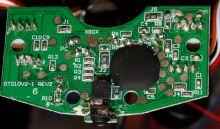
The IC on the board is epoxy-blob'd, so presumably custom.
While PS2, PC, and XBox variants all look the same and are all connected through USB, they are not quite interchangeable out of the box.
Some revisions can be easily tweaked, others not.
Board revisions
All boards are USB, so all are detected fine on a PC (name, HID, layout).
...but Rev 1 is PS2-only will in that it will not seem to output any values on PC. (I've always assumed such incompatibility between game consoles was intentional, and at data level rather than USB level. That may be wrong.).
....while Rev 2 can be bridged for PS2, Xbox, and PC - it's even silkscreened as such.
They probably developed it for PS2 initially, then decided they wanted to release it for other platforms.
Interfacing one with software
If
- you like joystick input to software, and
- you have a rev2 GameTrak
then you take a few minutes to solder-bridge it for PC, and you're done.
Most music production software allows joystick input some way or other, be it
If you have a rev1 GameTrak, it's just made for PS2s.
It still presents as a joystick, but it's just odd enough that it won't work.
It's presumably possible to create a PS2-gametrak-specific driver to deal with the different format, but not really a convenient solution in that most platforms do not make custom drivers very easy to use (and it being USB HID does not actually make that any easier).
So for me this became a DIY project instead:
Your own hardware
The potmeters are all 5kOhm, so putting them across Vcc and Gnd is fine (dissipates 1mA each at 5V).
Wiring the wiper (middle pin) to an ADC doesn't even really need any extra components.
You want
- some board with an ADC that muxes to at least 6 pins (because six pots)
- most arduinos, various other microcontrollers (but not RP2040 (RPi Pico)), other
- something that will fit in there
- e.g. arduino micro and nano, RP2040 (RPi Pico), other
And may prefer:
- preferably something that can speak USB, so you can get it to speak USB-MIDI
- e.g. arduino leonardo, micro; RP2040 (RPi Pico), other
I only had a nano lying around, so made one with a DIN MIDI output instead of USB-MIDI.
Which means the electronics work is little more than wires - barely even any resistors or such.
My version is little more than a bunch of cutting, soldering, heat-shrinking, and hotsnotting down the Arduino.
You can go a more custom if you want.
For example, this project made a PCB (for a PIC microcontroller) and the same sized board and the same sockets as the original, so that you don't even need to cut anything.
There's a number of similar projects and plans you can find around.
The things you may want to plan up front:
- how and where to fasten the microcontroller (there is not a lot of space)
- tension relief on the cable you have/add
- and how to expose the USB
- what you want to output - serial MIDI, USB-MIDI, CV, or such.
- I went for
- serial MIDI because I didn't have a ATmega8U2 style board on hand
- and prepared for CV
- could be PWM-based (but you would probably want to filter that)
- could even be basically (buffered, voltage-divided and possibly shifted versions of) the pot outputs themselves
If you're just controlling parameters, you might just want to output most or all axes to CC, so that you can decide on the DAW end what to do with it.
If you want it to play something more directly, you will need it to make more decisions. Say, I wanted it to be more of an instrument that doesn't need heavy DAW-internal mapping, so experimented with
- one side controlling
- which note is being played (remembered for next note trigger)
- which scale to quantizing to (remembered for next note trigger)
- pitch bending (sent as CC)
- the other side
- triggering notes pluck-style (sent as NoteOn), or violin-bowomg-style (sent as CC)
- have otherwise unused axes send CC
It turns out that imitating motions of a real instrument makes a lot more intuitive sense than six degrees of freedom that do seemingly arbitrary things.