DIY MIDI controllers
In theory
My approach here
- You make a device speak MIDI
- You connect MIDI to the computer
- You tell a DAW (=software for music people) to listen to MIDI and make sounds in response
- ...and to alter those sounds. In a musical sense, parameters and effects and other processing cannot be underestimated here.
- yes, you can go without a PC, but it's often more work
- note there are non-DAW noisemakers -- like ChucK or Kyma or Max.
MIDI was a classic in "let's separate the input method from the sound generation".
MIDI sends notes, yes - any pushbutton can be a note trigger.
- Yet piano-style keyboards have that down, and velocity sensitive triggering is pretty cheaper to buy than to make, and that means of expression is great to have
MIDI also sends parameters -- "amount of something
On a MIDI keyboard, that may only be the modulation wheel (and the pitch bend, but that is special-cased)
The interesting part is that DAWs tend to let you use that to control anything that remotely looks like a knob in software.
Also, you can have a lot more than just one.
The limiting factor becomes 'what do you do with all these parameters.
Creativity's the limit, but also, it really helps if this stays somewhat intuitive.
Okay, but how?
Any potentiometer (like a volume knob), or slider, can be a parameter.
Maybe you use a joystick to, say, control a low-pass filter in one direction, and volume in another.
You will probably end up spending a bunch of time configuring what signal should go where.
You sort of have the same problem as in modular synths -- except that in software, those wires aren't even visible. Most software won't draw them because while it would be nice and visual in theory, there are often just too many things.
There are some conveniences worth mentioning in this context.
Before we begin
DAWs can be expensive -- but don't have to be
- I would recommend you start for free or cheap, until you know this is a Serious Hobby. Yes, you will have to relearn if you switch later, but it saves a bunch
- There are pricy choices like Ableton, FL Studio, that cost a few hundred bucks. Their refinement ends up being worth it for many professional musicians, but overkill if you are going to use 1% of its functionality
- There are "get you hooked" editions of the pricy ones, that tend to do enough
- There are paid-but-cheaper choices that do more than enough, like Reaper or MuLab
- There are even free choices, like Cantabile
- I would recommend you start for free or cheap, until you know this is a Serious Hobby. Yes, you will have to relearn if you switch later, but it saves a bunch
- I have used Cantabile for the drumkit, because it needs _nothing_ more than getting MIDI to a drum plugin.
- I chose MuLab for somewhat-more-complex fiddling, primarily for 'not the expensive one' reasons.
- That is not endorsement
- That is not a complete list - do your research (...but don't get lost in it)
MIDI (over cables or not) is not the only thing in town.
- networking is an option, and WiFi is viable for a number of things
- a USB game controllers sidesteps MIDI -- though have to be specifically supported by the DAW (many do)
Also take a look at a Beardyman performance
- those touchscreen are mostly parameters -- but often groups of functionality, like "I want a dry drop so do X to the drum channel, Y to the pad channel, take the reverb off the voice channel"
- point is that there can be intuitive value to an inbetween that changes simple input into more complex things
- I believe that setup speaks OSC -- which is less of a musical and more of a technical choice
- it makes it easier to do that over things that are not a mess of MIDI or USB cables
- it means he can get a some information back, e.g. volume levels, timing within a measure (MIDI is mostly one-way)
This can get a little more technical
Making devices that spit out MIDI
It's data, so you need something that speaks data.
It's something you make, so you probably want it to be programmable.
That means we are in the area of microcontrollers.
You will need some programming skills, but this is well within the realm of 'there are tutorials about this' and 'copy pasting will get you somewhere'.
If you have a friend who likes to say 'arduino', talk to them. This may be a fun project for them too.
There are broadly two choices:
- Serial MIDI - is a serial port, every microcontroller has those, and most can be told to speak MIDI
- This lets you make devices compatible with anything from MIDI's first decades
- and lets you connect it to a PC with a USB-MIDI adapter
- USB-MIDI - if a microcontroller natively speaks USB, chances are it can be - which to a PC It will be recognized as 'a MIDI thing' without dirvers (because MIDI is part of the USB spec)
- lets you feed it into a PC DAW more directly
- ...but not to separate MIDI devices, you will need to route MIDI to a cable with a USB-MIDI adapter
MIDI and channels
How do I tell each instrument what to do?
MIDI has 16 channels.
- Soundmakers tend to listen to just one, and controllers play on one, or maybe two
- but you could go crazy here if you wanted.
Assuming that a channel = a device, you probably
Because also care about parameters, we also care about what MIDI calls CCs.
- A CC is sent on a single channel and for a specific 'controller number' - basically a single dial/fader/whatever
- (...you will actually run out of unused CCs after a while - the extension of that is NRPN - you can worry about that later)
There are some parameters that are special-cased, because MIDI is after all music-specific already
- aftertouch is the idea of sensing e.g. pressure in a key after the 'start making this tone' was sent
- pitch bend
You wouldn't think it, but "in my PC, how do I get MIDI from one program to another" is a good question.
MIDI was classically a single chain of devices - where order even mattered.
And the way PCs think about MIDI is still modelef after that.
It makes sense, because it's like having two sets of instruments on two different loops connected to different PCs.
But
- where the physical wire variant of that makes that an obvious thing to rethink,
- the 'everything is virtual inside your PC' variant needs a bit of a mental model of why - like the cables - what you're doing is a little wird.
That duct tape absolutely exists, and is free, but you have to know about it.
- (note that duct tape is functionally like the hardware duct tape: MIDI splitters and joiners)
More practically
MIDI mapping in various DAWs
TODO
Some devices
Hardware you may or may not want
Minimal arduino-style controller notes
TODO
Slightly less minimal
GameTrak notes
Intro
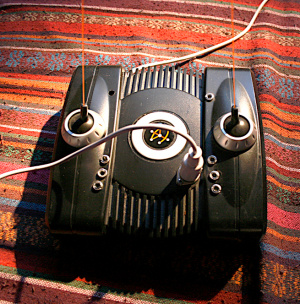
GameTrak is a motion controller originally designed for Playstation 2 - where it seemed to have gotten support from two games ever -- and later also supported PC and Xbox.
Judging by a youtube search, the now-common use seems to be DIYing it for other purposes, primarily music - take a look at videos like:
- Game Trak Theory
- Ge Wang: The DIY orchestra of the future
- Stanford Laptop Orchestra | Twilight (2013)
- Line of voice and string -for Game-trak controller, Kyma system.
See also:
How does it work at low level?
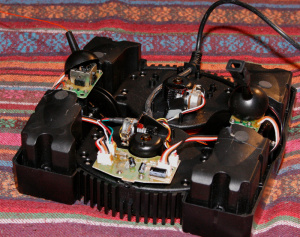
Think of a gamepad joystick.
Now remove the thing that makes that joystick return to center.
Also, drill a hole in the middle and run a string through, which would move that joystick around.
Also, put that wire on a (spring-returning) spool that also rotates a potentiometer to tell you how far out it is.
Oh, and a chunky weight that keeps the thing on the floor.
Electronically, this "patented mechanical system for tracking position of physical elements in three-dimensional space in real time"
is three 5kOhm potentiometers. Times two, it has two sets of that.
That's entirely it for measurement.
How does it work at higher level?
The board in there is sampling those potentiometers, which - if you can measure voltage - already just gives the "is at this position in my full range".
There's also an input for a - wait for it - pushbutton.
The board presents the result as something more joystick-like.
In some cases, that's all we need. In other cases we need to imitate what it does, because...

Board
The IC on the board is epoxy-blob'd, so presumably custom.
While PS2, PC, and XBox variants all look the same externally, and are all connected through USB,
they are not quite interchangeable out of the box.
All are detected detected fine on a PC (name, HID, layout) -- but it will seem to not work. (I've always assumed such incompatibility between game consoles was intentional, and at data level rather than USB level. That may be wrong.).
Some revisions can be easily changed for different output, others not.
- ...Rev 1 is PS2-only will in that it will not seem to output any values on PC.
- ...Rev 2 can be bridged for PS2, Xbox, and PC
- it's even silkscreened where to jumper it
They probably developed it for PS2 initially, then decided they wanted to release it for other platforms.
Interfacing one with software
Consider seeing if you can use it as a joystick
Most music production software allows joystick input some way or other, be it directly (various DAWs can do this out of the box).
There is also software that turns joysticks-or-gamepads to MIDI.
So if you
- you have a PC-specific, that more or les just works
- you have a different, but rev2 GameTrak, then you take a few minutes to solder-bridge it for PC, and you're done.
If not
If you have a rev1 GameTrak, it's just made for PS2s.
It still presents as a joystick, but it's just odd enough that it won't work.
It's presumably possible to create a PS2-gametrak-specific driver to deal with the different format, but not really a convenient solution in that most platforms do not make custom drivers very easy to use (and it being USB HID does not actually make that any easier).
So for me this became a DIY project instead:
Your own hardware
The potmeters are all 5kOhm, so putting them across Vcc and Gnd is fine (dissipates 1mA each at 5V).
Wiring the wiper (middle pin) to an ADC doesn't even really need any extra components.
You want
- some board with an ADC that muxes to at least 6 pins (because six pots)
- something that will fit inside the GameTrak case
- preferably something that can speak USB, so you can get it to speak USB-MIDI
Between e.g. the Arduino Micro, Arduino Nano, RP2040 (RPi Pico), I wanted to use a Micro, but only had a Nano lying around, so made one with a DIN MIDI output instead of USB-MIDI.
Which means the electronics work is little more than wires - barely even any resistors or such.
My version is little more than a bunch of cutting, soldering, heat-shrinking, and hotsnotting down the Arduino.
You can go a more custom if you want.
For example, this project made a PCB (for a PIC microcontroller) and the same sized board and the same sockets as the original, so that you don't even need to cut anything.
There's a number of similar projects and plans you can find around.
The things you may want to plan up front:
- how and where to fasten the microcontroller (there is not a lot of space)
- tension relief on the cable you have/add
- and how to expose the USB
- what you want to output - serial MIDI, USB-MIDI, CV, or such.
- I went for
- serial MIDI because I didn't have a ATmega8U2 style board on hand
- and prepared for CV
- could be PWM-based (but you would probably want to filter that)
- could even be basically (buffered, voltage-divided and possibly shifted versions of) the pot outputs themselves
If you're just controlling parameters, you might just want to output most or all axes to CC, so that you can decide on the DAW end what to do with it.
If you want it to play something more directly, you will need it to make more decisions. Say, I wanted it to be more of an instrument that doesn't need heavy DAW-internal mapping, so experimented with
- one side controlling
- which note is being played (remembered for next note trigger)
- which scale to quantizing to (remembered for next note trigger)
- pitch bending (sent as CC)
- the other side
- triggering notes pluck-style (sent as NoteOn), or violin-bowomg-style (sent as CC)
- have otherwise unused axes send CC
It turns out that imitating motions of a real instrument makes a lot more intuitive sense than six degrees of freedom that do seemingly arbitrary things.
MIDI drumkit notes
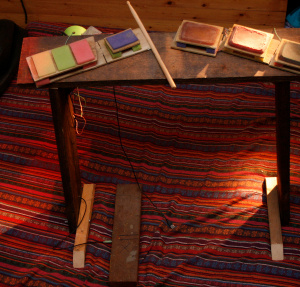
The idea: build a cheap electronic, velocity-sensitive, MIDI-output drumkit.
There are many simple and cheap DIY drumkit ideas out there. Check the usual video sites.
The most basic version of this is
- get an impact sensor, put it on a pin, react whenever a lot happens on that pin
- send according MIDI note on serial
And most of them do that quite well, actually.
I wanted to see if I could refine the idea a little, both electronically, and physically.
It's a neat DIY project, in that it has analog and digital and physical things to figure out, manageable and educational.
And it's pretty satisfying to have it not only work but make loud sounds.
Wishes
You may care about a few different things
- getting enough energy to the sensor, and consistent amount of energy to it
- more makes it easier to reliably measure impact and its velocity
- detecting velocity
- and getting it reproducably
- getting minimal energy to neigbouring pads - i.e. physical isolation from others
- avoid false triggers (without having to hard-ignore pads, which would be bad for real drumming)
- allows us to be more sensitive
- allows some choice between finger drumming and stick drumming (there's a large energy difference)
- allowing fast drumming, without false triggers
- we'll discuss why this is a thing later
- having it be useful for practice
- pads that aren't loud
- half the reason is fewer complaining neighbours
- relevant for stick drumming, not finger drumming
- getting the pads to physically bounce roughly like their real-world counterpart
- do hihat pedal properly
- and potentially things like muting
- pads that aren't loud
Physical design
The simplest designs often use a piezo sensor.
Most of the fancier versions also use a piezo sensor -- see e.g. V-drum fixing videos.
Not only are they cheap
- they are generally just pretty great sensors for moderately strong vibrations.
- They're sort of like contact mics, but react best to a relatively low frequency
For finger drumming, the entire construction can be physically made pretty small.
For drumkit drumming, you probably want decent-sized pads (for aiming reasons).
The implied large surface is nice for a consistent amount of energy and resonance for you to measure, which also makes it a little easier to get a more predictable amount of energy.
Keep in mind that you want to attach a piezo in a way that transmits vibrations well (figure out the resonant nodes),
doesn't fall apart immediately, or preferably at all.
A solid board is good enough for quick tests.
- The main resonant node is typically in the middle, so that's where you get best response
- A dollop of wood glue works well enough for testing, but likely to break sooner rather than later.
- Something solid holding it in might, if it's too solid, locally stress and damage the piezo over time.
- A holder with something soft may dampen the response, for better or worse. You at least want to know/control that.
(I plan on modifying something like [1] with space for rubber (to connect) and foam (to isolate))
Also keep in mind that the wires on the piezo also carry shock directly to the piezo, so you probably want to isolate at least the last part of wire (Bit of foam, hot snot, or whatnot) from the part of the wire that may get touched or moved, or might rattle.
The bit you hit
Some of the mentioned issues can be solved largely in physical design, making your life easier once you get to the electronics and code.
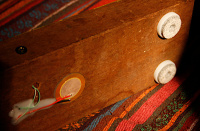
'If you want this kit to be electronic to stay friends with your neighbors, or have it be real practice for a real drumkit, then you want it to not only have velocity sensitivity, you also may care
- to have something you can hit with a bunch of force, have it stay in place, and not break
- to have something with real bounce
- to have something with a real layout
- to get a sensible bounce
- to get a hihat pedal
- to get sensors to detect edge hits
- to get sensors to detect bell hits on cymbals
- to get sensors to mute cymbals
...and whatever else you can think of.
If you want something to just work at all -
If you do not care about such details yet, then version one can be gluing a piezo on the back of something. Say, a piece of wood with maybe a piece of rubber on it (...also, if all those things, then consider an actual drumkit).
Don't worry about it.
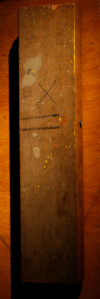
That test kickdrum 'pedal' in the image is made of a piece of hardish wood, a piezo disc, a socket, and some glue. (which actually also makes it sort of a contact-mic'd stompbox)
A good middle way is finger drumming -- I'd recommend your first version be this, if only for the satisfaction.
The forces are much smaller, it won't break so quickly, disturb your neigbours, it's easier to isolate hits from each other, and there is no expection of this being real practice.
Once you do care about some of that design, things start getting harder, and making this will itself become a hobby.
In particular the bounce. Having played on both a fifty buck electronic kit, and a hundreds-of-bucks one with meshes and rim sensors, yeah, the meshes feel a lot better, because it basically is a drum, just with a quiet skin and no need for the thing itself to acoustic resonance.
Say, the block-of-wood basedrum mentioned above has actually pretty-good sensitivity -- but that fancier drumkit's "regular kickdrum pedal hitting a piezo" makes a lot more sense for practice (~thirty bucks for a pedal isn't too bad).
A real hihat pedal may make a lot more sense to you than a pedal and surface not clearly connected.
But that's a lot harder to DIY.
Also, a large setup solid enough not to break is also hard-couple energy well, so unless you deal with mounting details, different sensors will easily get some of the energy from adjacent hits.
The more you want sensitivity, the more that matters.
It's not hard, but it's going to take iterations. Unless you really enjoy the DIY, at some point a cheap mesh kit is just worth buying.

If you do care about the bounce and loudness, and about crosstalk and the false triggers that may cause on closeby pads, then the materials above and below the pad matter.
Good physical isolation is a little more work than you'ld think, if you want an otherwise solid thing. (For example, I at one point had a MIDI guitar, which has piezos detecting the picking of each stringalike, which if you pick them hard enough will trigger the next one over even though they're mounted in rubber. Could be lessened with filtering by velocity at MIDI level, but that a commercial product has this issue is an indication of the problem)
These materials also change the strength of the signal and the resonance of the pad, so means your code shouldn't assume too much about the design, and means you may want at least basic calibration in the velocity detection part.
Piezo as a sensor
Physical considerations


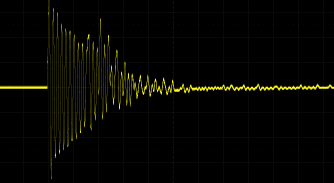
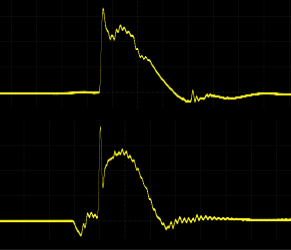
What kind of response do you get?
Piezos are essentially stress sensors, so respond well to force/weight, impact, and vibration including that caused by impact.
The shape of the response varies a bunch with mounting, and the damping that implies.
The images on the right are there to give some idea of how much. More on this below.
On the right some idea of the variation of signals you get depending on mounting and what you hit it with. All use the same scale: Horizontal grid=2ms, vertical=1V. This is without the discharge resistor, so these should settle better in reality.
They have capacitance, so it varies with how it's sensed
Due to their design, they can be seen as stress-to-voltage sensors, but also have a decent amount of capacitance, on the order of nanoFarads, which means that by themselves and with high-impedance readout, they hold voltage so seem to shift around in voltage.
When used to detect hits, you probably want to treat it as polarized
While piezos go both ways in terms of bending and stress, when you mount it you often make one direction of bending more likely, in which case the response isn't quite equal on both sides.
If you then interpret it single-sided (without bias, so basically ignore half the waveform), one way will be more responsive than the other.
The piezo in a circuit
You can model the piezo itseld as three things in parallel:
- a stress sensor with voltage output
- a few-nF capacitor
- a GOhm-scale(verify) resistor(verify), which makes it irrelevant in many senses
Without any further components, stress will generate voltage, and that capacitance will hold that voltage for a relatively long time.
if you hook up a piezo directly to an ADC, you get what looks like a different-but-fairly-steady resting voltage after each hit
Resting a weight on the pad will give a proportional high value (falls off eventually), as the above curve with a foot resting on it illustrates.
You may even get small changes over time and with temperature as the piezo and/or the thing it's attached to expands or shifts.
You can write code to try to deal with such shifty input values (largely by subtracting a recent average), but it's messy, and there's more edge cases where you can still get wild triggering, or e.g. the voltage going out of range, which you can't really control.
So many designs add a resistor across the piezo.
Technically it's a RC frequency filter,
- yet more practically it just means it will discharge the voltage from piezo's capacitance sooner rather than later.
- ...more practically yet, it means means the voltage output is now primarily the changes in stress, and will go to 0V the rest of the time. (it also means a ground-referenced ADC will only see half the waveform, but that's often acceptable, and also relatively easy to work around )
This technically being a filter means can quantify its impulse response.
Which helps a choice:
- since a piezo disc's capacitance will probably be in the ballpark of 500pF to few dozen nF (depending on its size)
- and you probably want dropoff within a few dozen milliseconds
- ...you want a resistance on the order of magnitude of 100kΩ.
(More widely, something in the range of 10k to 1M can make sense, varying with specific components and further design choices. If you wanted to make a drum interface separate from the impact sensors and make it "plug in any sort of piezo", you could also add a ~1M trimpot, in series with ~10k as a minimum, so that you can tweak this later)
If you are multiplexing a single ADC, and find the signal is bleeding between the channels
This is probably not because of flaws in muxing, or sampling too fast.
It's probably because ADCs like the Arduino's, and its muxing, are designed to sense things with lowish output impedance (<10kOhm for AVRs, see the "Analog Input Circuitry" section in the datasheet).
If the impedance of what you're measuring is higher than that, then the interaction with the ADC's internal sample-and-hold capacitor starts to noticeably become part of its sampling.
One thing you could try is lower the discharge resistor. While lowering it to ~10kOhm lessens this crossbleed, it comes at the cost of having a weaker signal (making it less sensitive) as well as changing the RC circuit with the piezo to dampen faster (which makes velocity sensitity harder), and it only lessens the issue, and doesn't solve it.
My test circuit
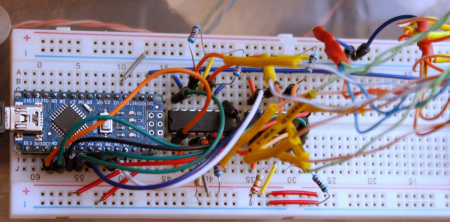
Electronically:
- Arduino Nano (muxes 8 analog pins),
- a serial MIDI socket (out of frame).
- two LM324s (quad op-amps) for eight buffers,
- eight 3.5mm sockets (out of frame. Half of the visual mess is the wires going off to them)
- resistors for discharge and gain
After this photo those op amps ended up as voltage followers (gain=1), because the largeish piezos I have happened to peak at a reasonable voltage as-is, but in general you probably want to control the gain e.g. with a non-inverting amplifier.
Yes, I omitted the diodes in this. That isn't very smart long-term.
A better fix is presenting a low impedance to the ADC, via a buffer (which also implies the discharge resistor now only affects the dropoff), such as a FET or op amp.
My personal preference is op amps, mostly because those will also easily let you control the gain (and with quad op amp ICs it's a little smaller/easier to breadboard).
That said, op amps come with further considerations, like that the output voltage swing is usually lower than the rail, so try to keep under that effective clipping level.
Relatedly:
- If you care to build a buffer that also filters, take a look at e.g. AN4708 Signal conditioning for shock sensors.
- You can only multiplex so much before you can't sample fast enough to get well defined oscillations per drum channel, start aliasing, which would mean velocity starts being less robust.
- You may want to run the ADC faster, as the time resolution is more important than the amplitude resolution or noise.
Protecting your inputs
Diodes you see in a bunch of circuits seem to typically be zeners (5.1V, or lower, depending on the ADC and the circuit it's in) from ground to the input socket's signal, to clip peaks (dissipated in the diode), and protecting the ADC/buffer from peak voltages from the piezo, which could be a few dozen volts if hard-coupled and hit hard enough.
How necessary this is depends on a little the choice of piezo and resistor, and specs of ADC/buffer,
In a generalized design it's a good idea that it can help lifetime, at the cost of cents. They should be in even my test circuit.
Detecting empty sockets
Code
As the above electronic construction means self-dampening, the voltage output is amount of recent change.
That makes basic velocity-less code easy to write. Do analogRead, Is it above threshold, and have we not triggered this in the last 100ms or so? Then trigger MIDI note" goes a long way.
When you want velocity, and smartness to help isolation, then things become a little more interesting.
Physical isolation and sensitivity
If the physical part of isolation wasn't perfect, you'll still see a little of the force from neigbouring pads.
If you don't care about velocity, then the energy loss along the way may let you choose a threshold that is fine.
A little threshold tweaking can help (and you can make it adaptive).
Still, your probably want you physical design to lessens this a bunch.
Particularly when you do care about velocity, because the better the physical isolation is, the lower the 'played at all?' threshold can be, and the better we support softer playing without false triggering, even while you're hitting something nearby harder.
Yes, you also have the option of 'if two pads seem to hit less than a few ms apart, and one has rather lower intensity, then then maybe just trigger the strongest' - but
- that means you have to delay all hits a few ms.
- this will sometimes ignore actual playing, and may punish good timing
...so improving physical isolation is the better solution.
Velocity
Velocity isn't hard to do at all, yet making it work well and predictably is more interesting, and introduces some tradeoffs.
There are various methods. Some are simple, some are complex, some are slightly faster (latency-wise), some are more consistent, some are handier for softer playing, etc.
For example, we could watch channels for the initial hit.
Once we decide it has been triggered, we keep sampling it as long as the values keep increasing, trigger once it starts falling, with the peak value as the velocity.
This is probably the lowest-latency you can get, and it's simple code in that it doesn't need to store much. However, from those images above, there is sometime high frequency content - little bumps up and down on what is broadly and incline, which would make this sometimes stop too early/low.
Also, depending on how the sensor is attached, the first peak may be predictably stronger than much of the rest of the response, meaning that how fast it falls off (the damping) may actually be equally informative.
Also, if the signal is so strong that it clips, it will always report the same (maximum) value.
Also, using just the first peak may be a little less robust between similar hits, depending e.g. on physical resonance.
So another way is to, once we decide to trigger, keep sampling for a fixed time (probably at least 2ms, probably less than 10ms or so), and integrate/average the values (or e.g. an over-threshold time), and use that as the velocity.
This is more robust to high frequency content, to that potential initial clipping, and to different amounts of damping.
It may also be a little' easier to tell the difference between soft hits and physical crosstalk from other pads, because the latter will often arrive more damped(verify)
Note that this can be done without storing many samples in RAM (add magnitudes to a large-int counter, and divide by amount of samples later).
However, it does come at the cost of somewhat higher latency (though it's also fixed latency).
It also has a fundamental tradeoff between longer sampling time (more consistent velocity) and shorter sampling time (lower latency).
Also, one thing I'm not really addressing here is how different the piezo response can be depending on how you mount it.
Apparently there's some that try to find the envelope of the signal.
This is potentially more accurate, but is harder to do, and to have this be lower latency may take even more care, and specificity to particular piezos.
Since you don't have direct control over what pad voltage should correspond to the softest hardest hits (depends on the size of the piezo and the size of the pad), you may need to trial-and-error those values.
Or, in a more practical/serious setup, let you calibrate that.
- it's fairly simple to implement a 'play a few sample hits on everything
- and store that into EEPROM
- This also makes it more a lot more modular/portable around varying physical designs/piezos.
That also makes it easier to change the curve away from linear by applying a function (e.g. a power).
Fast playing (flams, drumrolls), hard playing, and false re-triggers
Playing harder means the signal is stronger (nice in that it makes velocity easier), but also a slightly longer time it takes for the physical vibrations to taper off - may be up to 40ms or so.
So if you're reading fast enough, and your logic was "collect 8ms and decide hit or not; repeat", then the next collection may see the tail of the same hit's peak, which may still be high enough to cause that logic to trigger again.
You can work around that by adding a "AND did I not trigger in the last 100ms?" condition in your note-triggering code.
A 100ms backoff on a channel is enough for basic playing, because that's 10beats/second, = 600bpm, and most playing is far slower.
...except for flams and drumrolls, which are hits that can be on the order of milliseconds apart, so if you care about these, you now do want to distinguish between a falloff and a new hit.
This is harder to get right. It's possible, but involves some informed tradeoffs.
One decent approach is to
- normally: leave a low threshold for triggers, because
- they come up from nothing
- a lower threshold can help velocity sentitivity (a little)
- a lower threshold can help lower latency (a little)
- for some time after a note trigger: temporarily set a higher threshold
- ...based on the last triggered note's actual strength if possible
- one issue is determining that new threshold reliably
- you probably want it lower than the first peak
- but higher than the average or you risk retriggers
This means a balance between
- general threshold low for lower-latency triggers,
- evade most dampened peaks from the same hit,
- still catch most similar-velocity hits.
If you do velocities, then you may like the ability to tweak the curve on the fly.
You may want some parameters to bias this towards one behaviour or the other.
Consider also that some channels have their own logic
- You're not going to do few-ms drumrolls on a kickdrum, so can reject this harder
- fast playing on a crash cymbal amounts to a sustain so the speed doesn't matter as much - while on a ride drum or tom this is more important.
And it's generally useful to have distinct inputs be specific drumkit parts anyway, though, if only because then you don't have to think about configurable MIDI mapping.
If you vary trigger designs, e.g. have kickdrum just be a block of wood, consider physical design having a some way to tweak thresholds and curves per channel.
Hihat logic
If you care to have practice for hihats, you want to include the pedal.
It should emit
- pedal-hihat when pedal closes, note number 44 in GM
- open-hihat when hit while open, note number 46 in GM
- closed hihat when hit while closed, note number 42 in GM
(Those notes are from the General MIDI percussion set, and some drumkits are known to deviate somewhat. If it wants note names: in theory they're G#1, A#1, and F#1 respectively, except the octave numbering is not well established within MIDI so may be off by one or maybe two)
Since the pedal should allow staying closed, you can't do that via a piezo, and will need one channel to read off a simple switch instead.
Any basic footswitch should work (you can find them as e.g. sustain pedals for keyboards). This is one area where buying probably gives you something sturdier than making, unless you're a bit of a mechanical engineer already, because you learn to stomp on these things.
There are also sustain pedals that try to imitate piano-like resistance which might be closer to real practice (though check whether you can stomp on them).
There are other options, like DIYing a swith onto a bass drum pedal.
In theory you could combine it with a piezo to also get velocity of the hihat close, but that's probably overkill, more work, and I'm not sure a lot of drumkits even use that information(verify)
Two-sensor logic
Muting logic
Cymbals could be muted. I've seen cheaper kits with a strategically placed pushbutton, and fancier ones with a capacitive strip (on the underside, but you would probably hold both sides).
Probably via a NoteOff (or NoteOn with 0 velocity).
I think I've also seen aftertouch for this use, but whether that works seems to depend on your specific drum software.
MIDI practicalities
(see also MIDI_notes#Percussion)
Most drum related sound makers only care for the NoteOn, but DAWs that visualize notes will get confused if NoteOffs never come, so my code sends a NoteOff ~10ms later (unless the next trigger is sooner than that).
MIDI Velocity
MIDI velocity works a little differently for drums than for other things, because of the dynamics of typical playing.
Regular playing may be around 100, and compared to that, velocities under 30 or so are barely heard (and some software may not emit sound at all, or it'd sound like a kit played in the next room). Even ghost notes would probably be at 40-60.
(I spent a day trying to figure out debug my electronics because hits went missing, when it was just that I'd spread them over the full range, so a small portion (under 15 doesn't actually trigger any sound on the software I was feeding it into)
As such, you should think about tradeoffs, between more expressiveness (sounds more natural), better repeatability, and how much you care about ghost notes.
It helps to have
- good physical isolation between heads (you can't allow softer hits if you can't distinguish them from hits on neighbouring pads)
- calibration
- habit in playing
- may help to put a transform that makes the mapping from physical to MIDI velocities nonlinear.
A little tweakability to that can't hurt.
PC side
Drum sounds
If you want to get decent sounds for free, try options like
- a decent free drum VST
- like MT-PowerDrumkit - has fairly natural drumkit sounds, and velocity sensitivity (and is free though has a click-once-at-startup annoyance, that you can disappear by contributing something once)
- ...in a VST host
- e.g. a free one like Cantabile
- if you don't have ASIO hardware, tell cantabile to use the WASAPI output, 48kHz (or higher) if you can, exclusive mode if you can, and you may be able to get away with 384-sample buffer on generic modern hardware, for ~6ms latency which is decent for drumming.
- or another DAW if may already have
OR
- Hydrogen, which is standalone and cross-platform
Linux has a steeper learning curve when it comes to MIDI routing, and low latency audio output.
It's on my list of things to figure out and summarize.